An SSL (or secure sockets layer) certificate proves to users, browsers, and search engines that your website encrypts data transfers. It’s a layer of protection which all websites should have, whether they feature data transfers between the users and the site. Let’s talk about SSL certificates and how to get one (for free).
What Does SSL Matter?

In an HTTP environment, data transfers are sent as plain-text. This leaves them easily readable by hackers. Utilizing SSL (making it HTTPS) that same data is encrypted, thus making it impossible to decipher during transfer.
As the webmaster of a website, you’re responsible for protecting your visitors’ and customers’ data. Besides the fact that keeping data secure is a good idea, being SSL compliant matters on your website for other reasons.
First, browsers flag sites which are not SSL compliant. How they do this varies between browsers, but most browsers notify the visitor if a site isn’t secure. The visitor might not know exactly what that means, but it’s not a good look. Some browsers won’t even load HTTP sites without a warning.
And secondly, search engines like Google know that being SSL compliant creates a better user experience because it’s safer. User experience is all search engines care about, so not being SSL compliant can actually hurt your rankings.
You can become SSL compliant simply by getting an SSL certificate.
SSL Certificate – How to Get One
Unlike the early days when SSL certificates first came about, it’s no longer difficult to get one. In fact, you likely already have one through your hosting provider just waiting to be claimed for your site.

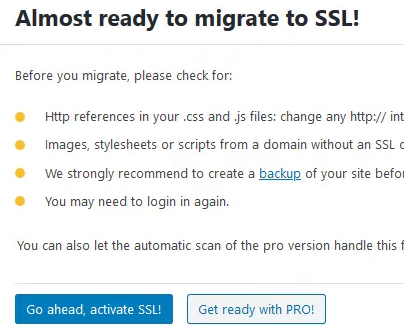
In WordPress, simply install Really Simple SSL, a free plugin which finds and connects your certificate with your site. Once the plugin is installed, simply click “go ahead, activate SSL” as prompted:
If for some reason your hosting provider DOESN’T have a free SSL certificate for you, Really Simple SSL can generate one for you. They show you how to install it virtually automatically via most hosting providers, as well.
After you’ve installed and activate your SSL certificate, the plugin also provides one click solutions to update WordPress and your htaccess file to redirect to the new HTTPS URL of your site.
It also reminds you to update your Google Analytics, Google Search Console, and any other tracking applications you use on your website to reflect the new URL. Continuing to track the outdated and no longer used HTTP version of your site will skew your analytics, so make sure to make that update everywhere.
That’s all there is to it. The SSL certificate automatically renews every few months free of charge if you go this route, and you’ll give visitors, browsers, and Google all the assurance that data transfers on your site are now secure.
I also recommend utilizing a security plugin to help safeguard your site. These plugins scan for malware and security vulnerabilities, block blacklisted IPs, malicious traffic, and brute force login attempts, and notify you of any security issues or alerts directly.
At the end of the day, it takes about 5 minutes to make your site secure between a couple of plugins. Let them do the heavy lifting then get back to your job of creating great content.

Pingback: How to Transfer Domain From GoDaddy to NameCheap - Angry SEOer