There are a number of things I always make sure to do every time I create a new blog post. Most of them are covered in my SEO checklist for blog posts, but I always just want to make sure that my post is as accessible as possible. Anchor links in WordPress are an easy way to make your post more navigable.
It’s incredibly simple to do, so let’s talk about what are anchor links in WordPress and how to make them.

Anchor Links in WordPress
First, let’s actually identify what anchor links in WordPress are.
This is an element on a page which allows you to link from one section to another within the same page.
This is especially helpful when you’re talking about a variety of things within one post and for longer posts. In this case, you might want to make a table of contents above the fold/at the opening of that post to better organize your content within the page.
This is also helpful when someone just wants to jump to the specific section/content they’re looking for in your post.
Your visitors should never have to work to find what they’re looking for on any given page of yours, and anchor links can do a lot of the lifting for you.
How to Make an Anchor Link in WordPress
It’s incredibly easy to make an anchor link in WordPress. You’ll actually notice that the two links in the second paragraph of this post itself are anchor links, one going to each heading section.
Making an anchor link is a two step process in WordPress.
Step 1 – Make an HTML Anchor
This sounds technical, but it’s not.
All you need to do is click on the block you want to jump to with your link (see classic editor vs block editor for more information on WordPress blocks).
This is the section you want the link you’ll make in the next step to jump to.
In the case of this post, I wanted to link in my opening section to jump to the “How to Make an Anchor Link in WordPress” heading of this section.
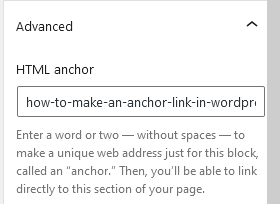
So I simply click on the heading, then click on “Advanced” in the block section on the right.
I then fill out the “HTML anchor” field with whatever text I want. I just used the text I used for the heading itself with dashes between the words:

This block is now ready to be linked to, we just need to create the link in Step 2 next.
Step 2 – Create the Anchor Link
This part’s a bit more conventional.
To create the anchor link, we highlight the text we want to be clickable and send people to the desired section of our page we just established.
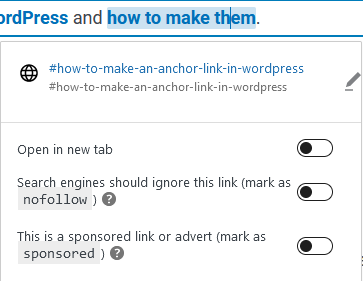
In this case, I highlighted the text “how to make them” in that second paragraph in the opening. I then clicked on the link icon.
Normally we’d put in a link to an external page or to another page on our website. Instead, we’re going to paste in the exact text we put in the HTML anchor field a second again, but with a hashtag symbol (#) in front of it like so:

You have the typical link options, though I recommend leaving them all unticked as they don’t typically apply for anchor links (unless for some reason you want them to open in a new tab).
In Summary
That’s all there is to it. Once you save the draft of or publish the page, you’ll find that the text is now a live link which goes to the section you created the HTML anchor for.
Note that you’re not limited to Headings to link to. You can add an HTML anchor to many different types of blocks including any kind of text as well as images.
Try to get in the habit of creating anchor links in WordPress to make your content more navigable and especially to help people find the specific content they’re looking for quickly.
Not only does it look more organized, but this will keep people on your website for longer and will earn you better rankings and more traffic.

Pingback: What is Above the Fold in Website Terms - Angry SEOer